
BLOG: Laser Power Meters for Laser Effect MPE Assessment
In this blog James Stewart provides an outline of some of the most important factors to consider when measuring laser effects, discussing what measurement devices can be used, while highlighting some of the challenges in checking laser lighting effects and how to avoid some of the mistakes he often sees being made. While James explains some of the key factors regarding measuring instruments, he also draws attention to the importance of understanding the timing characteristics of the effective exposures and how it is critical to relate these to the measurement capabilities of the device being used to check the exposure levels. James discusses why the oscilloscope is an essential part of the assessment process and offers some practical tips on checking meter suitability in the field.
Why we need to check laser effect exposure
Most people familiar with the operation of laser effects will be aware that exposure to laser light can be hazardous when too much light is directed at the faces of people, which can cause lasting damage of the eye’s retina. The location on the retina and severity of these injuries determine how noticeable to a person’s everyday vision the damage is. Fortunately, for many types of isolated retinal damage, and up to a certain point, the brain can perform a fantastic job in masking these additional unwanted imperfections from view. But relying on the good fortune that injuries go unnoticed is not really the right approach to adopt. Instead, to minimise the chances of damage occurring, the laser effect’s exposure levels should be checked against the safe exposure limits (the MPE), and set so they do not exceed the limits.
Checking exposure levels cannot be carried out by guesswork about how bright a laser effect is, or how warm a laser beam feels to the touch. (Yes, on more than one occasion I have people insistent the if they can’t feel any warmth from the beam or effect on their hand, it is safe to view. Which is of course not true!). Nor can a lux meter be used. This is because the exposure limits are not related to perceived brightness, but are instead determined by the amount and the duration the laser beam can illuminate an eye for.
Measurement approaches and requirements
Although in the past there have been a couple of MPE meters available commercially, these were very much niche devices, carrying high price tags, and in a time when legitimate safe audience scanning was less common (and harder to achieve), only seemed to attract a very limited number of users. So, with an absence of all-in-one commercial solutions, those wanting to determine the exposure level created by a laser effect must instead use standard laser beam measuring equipment.
This leads to the question I’m often asked, “what measuring device would you recommend?”. The answer unfortunately is not straightforward, and leans very much towards a “it depends…” response. The reason being that scanning laser beams can be quite challenging to measure and assess correctly. However, in terms of the measuring instrument, two very important points are essential:
- 1. The instrument must have a traceable calibration.
2. The limitations of what the instrument can reliably measure must be understood by the user.
The first point about having a traceable calibration is essential so that, if the meter is correctly used, there can be an initial level of confidence in the values the meter reports. The traceable calibration ensures that there is a level of validity to the values reported by the meter. Without this, the values are of little use as the relationship with real-life values is not known. The second point relating instrument limitations is similarly as important, because if the measuring system is used to try measure light that the meter is unable to detect properly, the results reported will be incorrect, and more than likely, significantly underreport the true amount of light present.
The number one mistake
The most common mistake I see people make when trying to measure a laser lighting effect is when they use a standard laser power meter intended to accurately measure stationary beams to measure a scanning laser effect, such as a stationary tunnel. The reason being that even though the tunnel appears stationary, the beam is moving quickly past the detector on each retrace of the effect, meaning that, at best, if the meter can register any signal from the beam briefly passing over the detector, the power reported will only be an “average power”, not the important “peak power” that is required to make comparisons with the MPE limits. The importance of knowing the peak power for this type of assessment cannot be overstated, for I’ve seen so many people make the mistake of either measuring the average power, or measuring what they assume is the peak power, but because the instrument is unable to handle the normal scanning speeds of typical laser effects, the reading provided by the meter seriously underreports the true value.
Understanding the expected exposure
The requirement for the user to understand what the measurement limitations are of their chosen meter also suggests that they need to have a good awareness of the characteristics of the type of exposure the laser effect is likely to create on both the people being illuminated by the laser effect, and the meter’s detector.
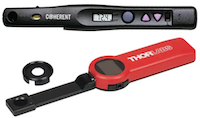 Lower cost integrated meter/detector systems such as the Coherent Laser Check and the Thorlabs PM160 compact handheld devices provide a convenient way to check the power level (and hence irradiance) of laser effects. These types of meters are usually only suitable for measuring typical stationary diffraction effects. If the effect is stationary, and if the laser output is genuinely constant, the reading reported by the meter is usually valid to compare against the MPE limits, because those meters are designed to measure constant output laser. However, any attempt to measure a scanning laser effect, even if stationary and with a stable output, will result in an artificially low reading that is not suitable for making the exposure limit comparison.
More advanced power meters with the ability to attach different detectors exist, but again, usually, these meters are designed to measure stable and constant sources of laser light with a high level of accuracy. The fact the meters discussed so far are only intended to measure continuous beams of laser light, again limits their use to checking the levels present in most types of diffraction effects, meaning they are not suitable for measuring scanning laser effects (without approaching the challenge differently).
The audience scanning meter
In recent years a couple of devices marketed as “audience scanning” meters have gained some popularity, and while it is possible to measure the peak power (or peak irradiance) of a beam that moves across the detector, I’ve been disappointed to see when attempts are made to measure a scanning beam approaching the speeds normally used for laser light show effects, these meters start to suffer in being unable to correctly report the true peak value of the scanned laser effect. Being sold as “audience scanning meters for laser light shows”, anyone could be forgiven for thinking that if the meter is used to measure a typical light show effect, the reading will be valid. But I’ve seen on so many occasions people trusting the reported value, unaware that the exposure they have measured exceeded the bandwidth of what the audience scanning meter can reliably measure, leading to real life exposures that exceed the safety limits. These meters have a use and can aid assessment, but it’s really important that the user understands the limitations in what their instrument can reliably detect and measure, and not just taking as gospel any reading reported by their $2000 - $3000 measurement system. Aside from bandwidth, another challenge for the users of these devices is that the meter is not set to audience scanning mode by default, so additionally (and based on the number of people I’ve seen use these devices in default mode), there appears to be an issue with people not knowing how to configure the device correctly. So always seek the advice from the manufacturer on how to correctly set up the meter for audience scanning measurements.
Sanity Check
It’s possible to get a quick indication if the value reported by the meter is likely to be valid by projecting a single colour stationary square tunnel effect, and taking measurements at different positions along the beam path, ensuring that you have a selection of readings from the middle of one of the flat edges of the square, and also some from the corner of the effect. Instinct dictates that you’d expect to see the reported values increase as the detector is moved to the “hotter” corner parts of the beam path. But if you do see the values increase, it’s a pretty good indicator that the meter is not up to the task of measuring this type of scanning effect. Another check that is useful is to reduce the scan-rate of the effect to as slow as laser control system will allow. Because we are interested in knowing the peak power or irradiance, the reported value in both cases should remain stable and not increase. If an increase is seen, it’s showing that measurement system can only reliably detect stationary or slow-moving beams. In this situation the meter is not suited to measuring faster scanned (which may just be normal laser effect scan-speed) beams.
It is normal to see the values reported reduce the further away from the laser projector the measurements are taken. It is not expected behaviour to see the values increase the further away from the source the measurements are taken. I say this because we’ve seen people believe and quote the incorrectly reported values by the meter in safety assessments, under the impression the values can increase with distance, seemingly not realising that the measurement artifact was likely due to using the wrong meter for the laser effect.
This last point highlights the importance of both knowing the measurement limitations of the measurement device, and similarly having a reasonable understanding of the type of exposure the scanned laser effect is likely to produce.
The power or irradiance reading is only half the story
The MPE limits are based on a maximum amount of light a person can be safely exposed for a specific amount time. Therefore, when using any of the instruments discussed above to measure the power or irradiance of a laser effect, a big assumption has to be made that the actual effective exposure duration (the time the light illuminates the meter’s detector) is what you think it is, and is not longer than that related to the MPE limit the exposure is being compared to. If the real-life effective exposure duration is longer, it means the MPE limit is being exceeded, creating a potentially hazardous exposure scenario.
Enter the oscilloscope
To overcome this serious shortcoming, an oscilloscope with a traceable calibration is used to help us “see” the type of light the exposure creates. More specifically, the oscilloscope is an instrument that enables the user to visualise the shape of a signal, which is, in the case of light show exposure, the effective pulse created by the scan, allowing us to see the duration of the pulse, its shape, and how often the scanned pulses of light occur. These characteristics are all important factors that are related to ensuring the correct MPE limit is applied.
In practice
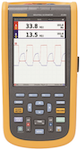
In the past we’ve used (and occasionally still do use) both PC-based and handheld oscilloscopes in the field to help determine these important quantities. Seeing when, how long, and how often the light occurs supports a robust assessment of laser lighting effect exposure. The choice for the user of whether to use a handheld oscilloscope or a PC-based device is a matter of personal choice, considering the device functions, ease of use in the field, and cost. There are many devices available as these are mainstream electronics diagnostic tools. Good quality PC-based devices are usually lower cost and more feature rich than their equivalent all-in-one handheld counterparts, but the trade-off is having to use another laptop/tablet and have cables on site.
 Using either type of portable oscilloscope solution is essential to gain a fuller picture about what people could be exposed to, and to understand how the exposure conditions relate to the measurement capabilities of the laser power meter.
The oscilloscope provides another really useful benefit, because being able to visualise the waveform created by the exposure additionally allows the user to configure and test the effectiveness (and validity) of a scan-fail safeguard with a good level of precision. The oscilloscope is used to set and determine the exposure duration at the point of automatic shutdown.
Using an oscilloscope and a laser power meter to field check laser lighting effect exposure levels is certainly quite feasible, which is good news, because it is really an essential requirement to know both the magnitude of the light and the exposure duration created.
In summary, commercial laser power and audience scanning meters can be useful tools to aid in checking exposure levels as long as they have a traceable calibration, and the limitations in what they can reliably measure are fully understood and taken into account. The use of an oscilloscope is essential to gain the complete picture, and to validate that both the reading reported by the meters is correct, and that the exposure timing is correct for the given power/irradiance compared to the MPE limit. The oscilloscope additionally should be used to confirm the detection and shutdown time of the scan-fail safeguard.
A peak at how we do things
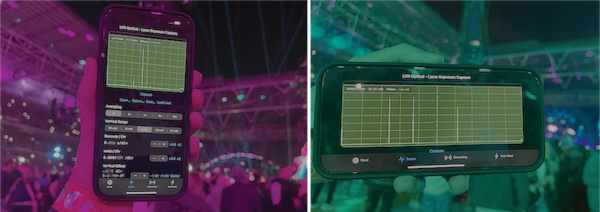
For many years we have been checking audience scanning laser effects in the field using a laser power meter and a portable oscilloscope. In more recent years we’ve been using a custom measurement solution based on using a tablet PC and precision high speed capture hardware that combines both measurement of the absolute intensity of laser light, along with the timing information the exposure creates. Last year we prototyped an even more compact version of this system that connects to an iPhone wirelessly and wired, that runs as a native app written in Apple’s preferred programming language, Swift. This year we have continued development, applied the traceable calibration, and had the opportunity to carry out field testing of the system. Like it’s predecessors, it runs fast enough to capture live show effects in real-time. But being truly handheld, saves carrying heavy bags around, and is a lot more suited to field use.
This measurement system is a side project intended for our own inhouse use.
© September 2025 LVR Optical